
Collector guide
How to Build an Obsidian Collection by Variety
A useful obsidian collection starts with the surface: glassy luster, color, sheen, banding, inclusions, polish, and edge condition. To build an obsidian collection by variety, choose a small set of representative pieces, label each one by visible traits rather than seller wording alone, and organize the tray so you can compare specimens under similar light.
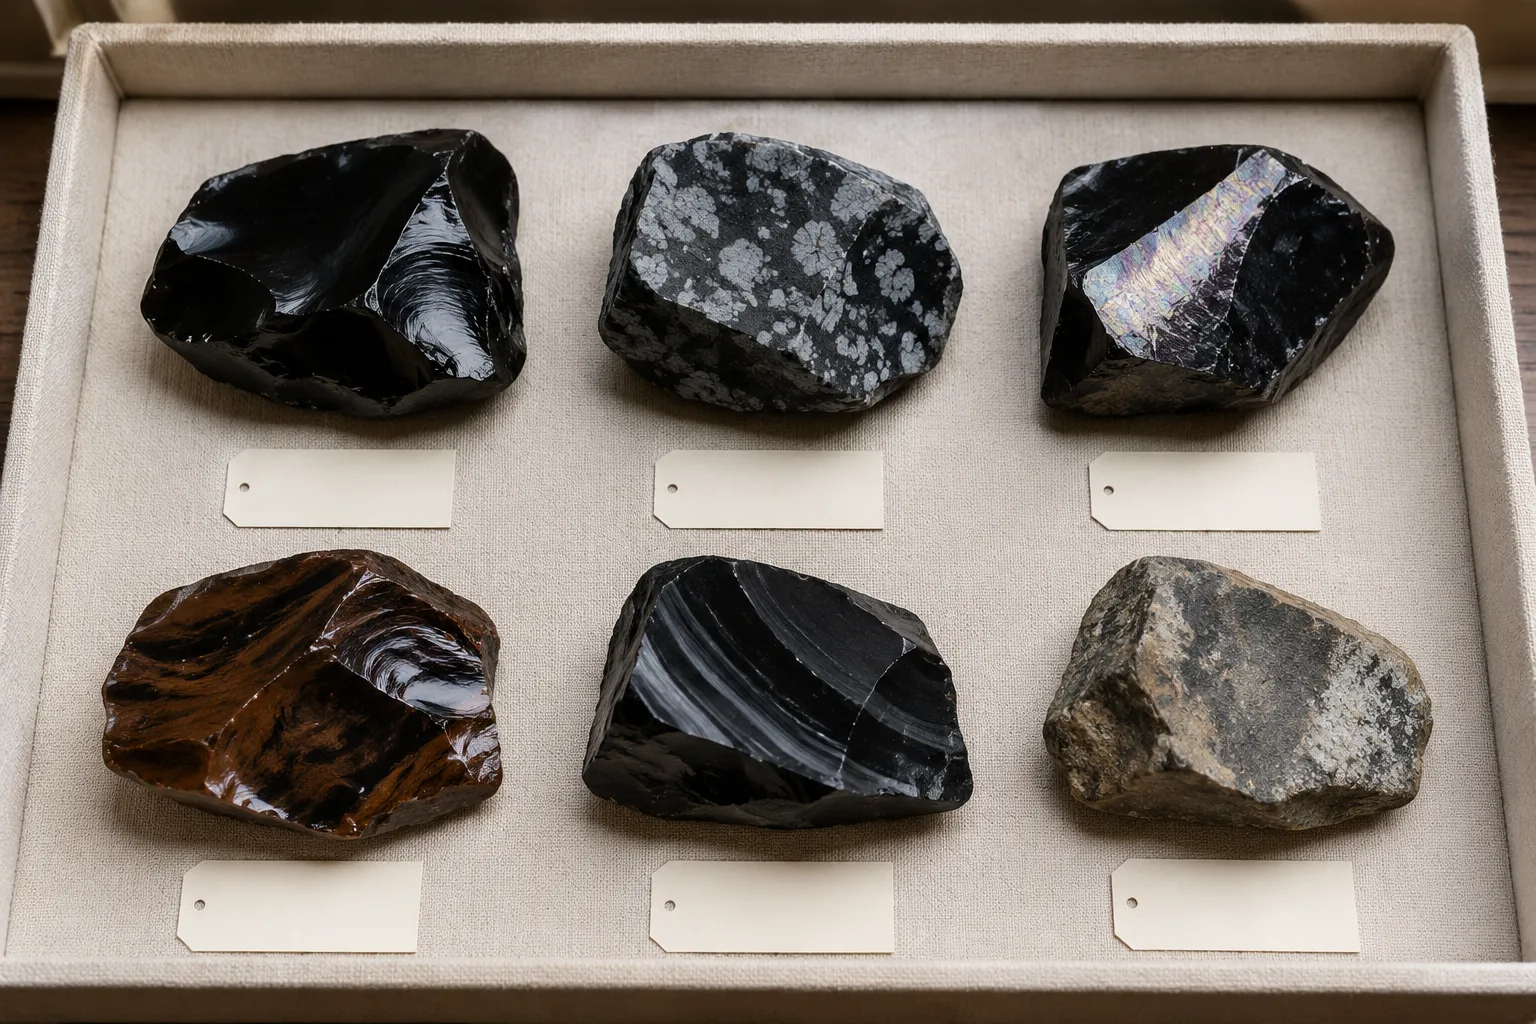
Start narrow. A strong first tray might include a plain dark piece, a snowflake-patterned piece, a sheen-bearing piece, a mahogany or banded piece, and one uncertain specimen marked for comparison. The goal is not to own every market name. The goal is to build a collection you can inspect, describe, question, and expand without treating a label as proof.
upward
Start with the broader guide
Use the broader guide first if you need the full scope before this page.
First tray target
- One plain dark piece
- One snowflake-patterned piece
- One sheen-bearing piece
- One mahogany or banded piece
- One uncertain comparison specimen
Start With Representative Obsidian Pieces
For collectors, “representative” means the piece clearly shows the feature you are collecting it for. A snowflake-patterned specimen should show pale scattered marks. A sheen piece should flash when turned under light. A banded or mahogany-colored piece should show visible color movement or mixed tones without depending on one perfect photo angle.
This matters because obsidian variety names often depend on appearance. Some names describe color or pattern. Some describe a reflective effect. Some are market names used differently by different sellers. A collection built only from labels can look tidy on paper while staying confusing in the tray.
Plain dark obsidian
Look for a glassy black or very dark surface. Label carefully because lighting can hide subtle color or texture.
Snowflake-patterned obsidian
Look for pale scattered marks against dark glass. Label carefully because pattern density varies by specimen.
Mahogany-colored obsidian
Look for brown, reddish, or dark mixed areas. Label carefully because color names can be broad.
Sheen obsidian
Look for reflective flash when rotated. Label carefully because polish and light angle strongly affect appearance.
Banded or rainbow-style obsidian
Look for bands, arcs, or color shifts under light. Label carefully because some effects are subtle in photos.
Uncertain comparison piece
Keep an interesting but not confidently named specimen as a learning specimen rather than forcing a fixed label.
That is enough to begin comparing obsidian varieties for collectors without turning the tray into a crowded name list.
Build Around Visible Traits
Before you accept a variety name, write down what you can actually see: “black glassy surface,” “gray-white scattered marks,” “brown patches,” “warm flash at one angle,” or “curved band visible under bright light.” The variety name can come after the description.
That order keeps the collection honest. “Rainbow,” “gold sheen,” or “mahogany” may be useful shorthand, but visible obsidian traits are what help you compare specimens later. If the label and the stone disagree, keep the observation on the card.
Inspection rhythm
- Hold it under steady daylight or a neutral lamp.
- Rotate it slowly to check whether sheen appears only at certain angles.
- Compare polished faces separately from rough or broken edges.
- Note whether the pattern covers the surface or appears only in one area.
- Avoid upgrading a faint feature into a firm variety name.
Polish changes appearance. A well-polished face may reveal sheen, banding, or depth that is difficult to see on a rough surface. A dull or scratched surface can hide effects, but that does not mean every faint mark deserves a stronger label. Record the current visible state.
For rough pieces, pay attention to the fracture edge. Obsidian can break with sharp, glass-like edges, so handle rough material cautiously and keep it away from polished specimens. The edge may also show color or transparency clues that a glossy face hides. Inspect; do not overreach.
Use Labels That Leave Room
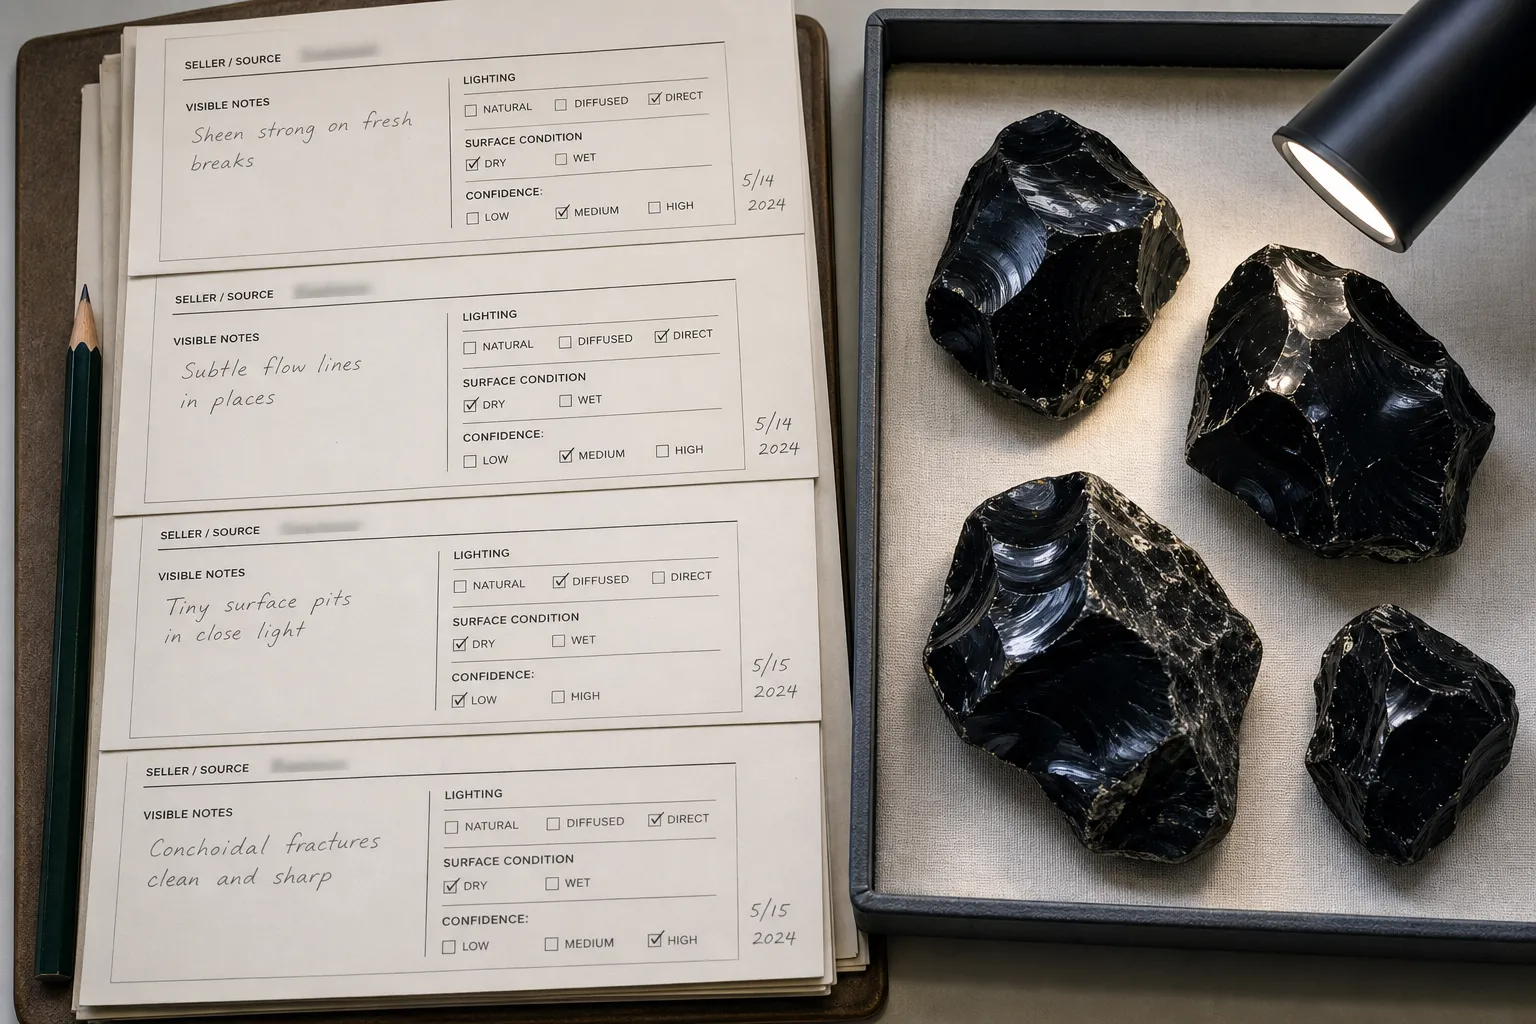
Good labels make a collection easier to revisit. A useful label usually includes three parts: the seller or received name, the visible description, and your confidence level.
A careful label might read:
“Seller name: gold sheen obsidian. Visible notes: dark polished stone with warm reflective flash on one side under angled light. Confidence: likely sheen variety; compare again in daylight.”
That is more useful than “gold sheen, rare, powerful, premium.” It separates market language from your own inspection. It also protects the collection from photo-only certainty, because lighting, polish, camera exposure, and background color can all change how a piece appears.
For labeling obsidian specimens, use cautious terms:
- “labeled as” when preserving the seller name
- “appears to show” when a trait is visible but not fully settled
- “compare with” when two varieties look similar
- “uncertain” when the name depends on lighting or one surface
- “not enough visible evidence” when the label is ahead of the specimen
Avoid turning a home label into an appraisal, origin statement, or proof of authenticity. A collection card records what was received and observed; it is not a final judgment about value or source.
If you keep a catalog, use the same fields each time:
Date acquired
Keeps collection history in order.
Seller or source note
Preserves where the name came from.
Variety name used
Records the working label.
Visible traits
Anchors the label to inspection.
Lighting notes
Explains why sheen or color was visible.
Polish or surface condition
Helps compare rough and polished pieces fairly.
Confidence note
Prevents uncertain names from becoming fixed.
This kind of obsidian catalog organization is especially helpful when collecting types that differ by subtle sheen, banding, or color.
Organize the Tray for Comparison
A beautiful tray is not always a useful tray. If the goal is comparing obsidian varieties, arrange pieces so the differences are easy to see. Put similar-looking specimens near each other. Keep uncertain pieces close to the variety they resemble. Leave space for labels.
One practical layout is to organize an obsidian tray by feature family:
- Plain dark pieces
- Patterned pieces
- Brown, red-brown, or mixed-color pieces
- Sheen pieces
- Banded or color-shift pieces
- Uncertain specimens in a comparison row
This makes visual inspection easier. You can see whether two sheen pieces flash in the same way, whether a banded piece needs stronger light, or whether a snowflake-patterned specimen is being confused with a different pale inclusion pattern.
Storage should protect the comparison value of the collection. Polished pieces can scratch or chip if they rub against harder edges, metal stands, or loose rough fragments. Use compartments, soft liners, small boxes, or individual bags when pieces are likely to touch. Keep sharp rough edges away from fingers and polished surfaces.
Do not let display lighting become the only evidence for a label. A sheen specimen may look dramatic under one lamp and quiet under another. A banded piece may need angled light. A dark stone may look uniformly black until placed beside a lighter background. If the label depends on a lighting condition, write that condition down.
A collector’s tray should answer one question quickly: “Why is this piece in this variety slot?” If the answer is not visible, the label needs more caution.
Treat Market Names as Clues
Obsidian variety names are not all used with the same precision. Some are common descriptive names that point to visible features. Others appear as shop categories, dramatic trade names, or symbolic labels. Those names can help you understand how a piece was sold, but they should not carry the whole identification.
For example, a seller label may mention a sheen color, a landscape-like pattern, a symbolic meaning, or a place name. In a collector catalog, keep that wording as received language, then add your own visual notes. The received name belongs in the record; the visible traits decide how the piece sits in the tray.
Symbolic meanings can be recorded as cultural or personal context if they matter to your collection, but they should sit after the material description. Meaning language does not identify the variety, confirm quality, or replace careful handling.
The same restraint applies to origin and value. Unless you have stronger documentation than a listing phrase, avoid turning a place name or quality claim into a firm catalog fact. Use “sold as,” “labeled as,” or “source stated” rather than presenting it as settled.
The collection becomes stronger when labels remain editable. If later comparison, better lighting, or stronger reference material changes your view, update the card. A good catalog can change without losing its history.
Build the Collection in Passes
First, choose one clear example of a major visual type.
Pick the specimen that shows its feature plainly, not the one with the most dramatic listing title. A modest but readable piece teaches more than an expensive-looking piece with a vague label.
Second, add a comparison piece.
If you have one sheen specimen, add another with a different flash color or a weaker effect. If you have a snowflake-patterned piece, add one with a different pattern density. Comparing two examples shows where a variety name is broad.
Third, add an uncertainty slot.
This is not a failure. An uncertain specimen trains the eye because it forces you to describe what is visible without rushing to a conclusion. Mark it clearly so it does not become a false reference piece.
Fourth, photograph each piece under the same conditions.
Use the photos for your own catalog, not as final proof. Include one straight-on image and one angled-light image for sheen or banding. Note if the photo exaggerates or hides the trait.
Fifth, review the tray after a few weeks.
Move pieces if your labels have become clearer. Combine categories if they are too thin. Split a group only when the visible differences are consistent enough to justify it.
This sequence keeps collecting obsidian types practical. Visual inspection can guide a collection, but it cannot settle every question alone.
When To Pause Before Adding Another Variety
Add a new variety when it teaches the collection something visible. Pause when the new piece only adds another name without a clearer trait. Five well-labeled specimens can be more useful than a drawer of uncertain market names.
Pause especially when:
- The listing name is more detailed than the photos support.
- The piece shows its claimed feature only under one dramatic light angle.
- The label includes origin, rarity, or value language you cannot verify.
- The stone duplicates a specimen you already have without adding contrast.
- The edge condition or storage needs make it awkward to keep with the tray.
This is not a reason to avoid unusual pieces. It is a reason to give them honest labels. “Interesting dark polished obsidian with faint banding; variety uncertain” is a respectable catalog entry. It tells the truth and leaves room for better comparison.
Quick Checklist for an Obsidian Variety Collection
- Can I describe the visible trait without using the seller name?
- Does the feature still show under normal light, or only under a special angle?
- Is the surface polished, rough, scratched, or chipped in a way that changes appearance?
- Have I kept the received name separate from my own observation?
- Does this piece add a new comparison point to the tray?
- Have I marked uncertainty where the evidence is limited?
The strongest obsidian variety collection is not the one with the longest name list. It is the one where each specimen can be picked up, inspected, compared, labeled, and questioned. Keep the glassy luster before the label; let the tray grow from what the pieces actually show.